
The Lego EV3 is widely used and lots of information can be found about it online. Even so, in the course of our work, we may still find some interesting quirks or observations. Those that we find sufficiently novel and useful are documented here.
- Touch Sensor (“Released” isn’t what it seems)
- Color Sensors (Mutual Interference)
- Color Sensors (Interference from Room Lighting)
- Color Sensors (LED Positions)
Touch Sensor (“Released” isn’t what it seems)
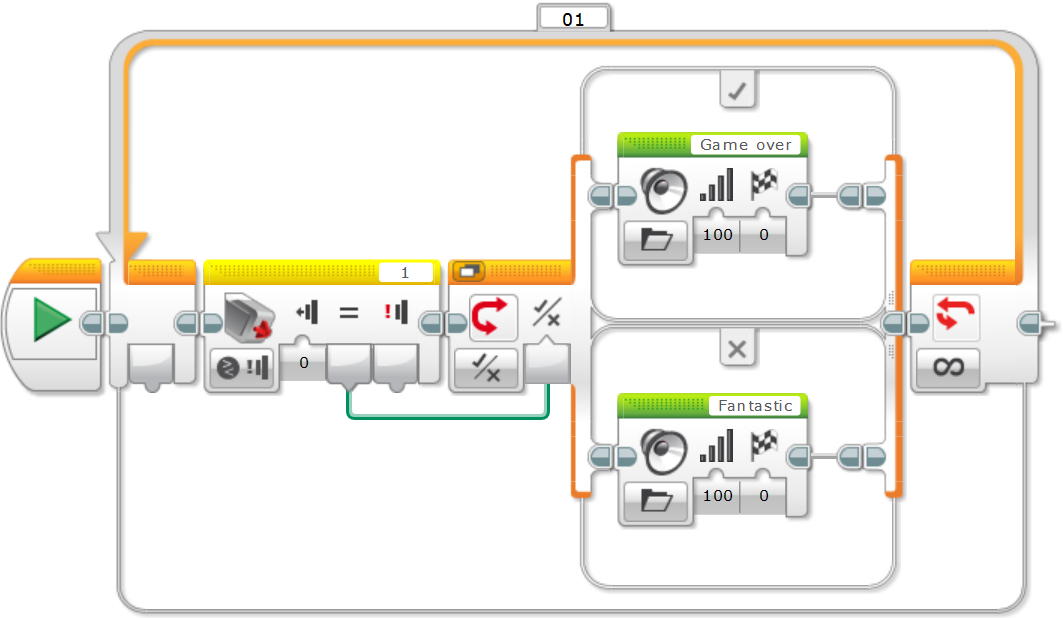
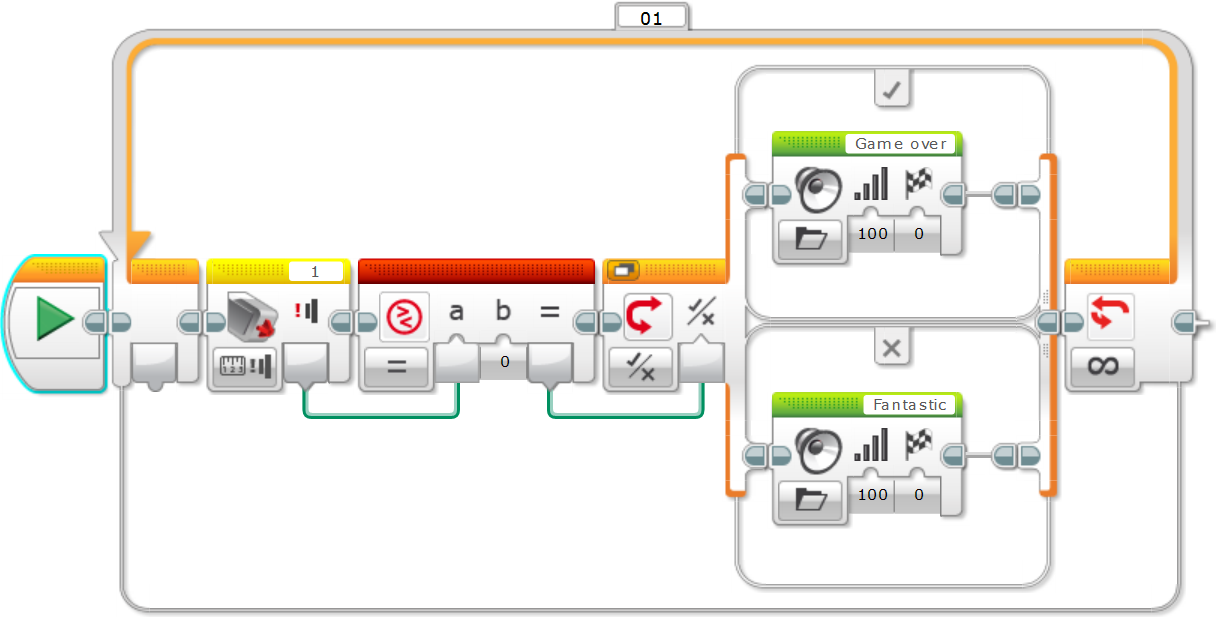
Consider the following three programs in EV3-G…
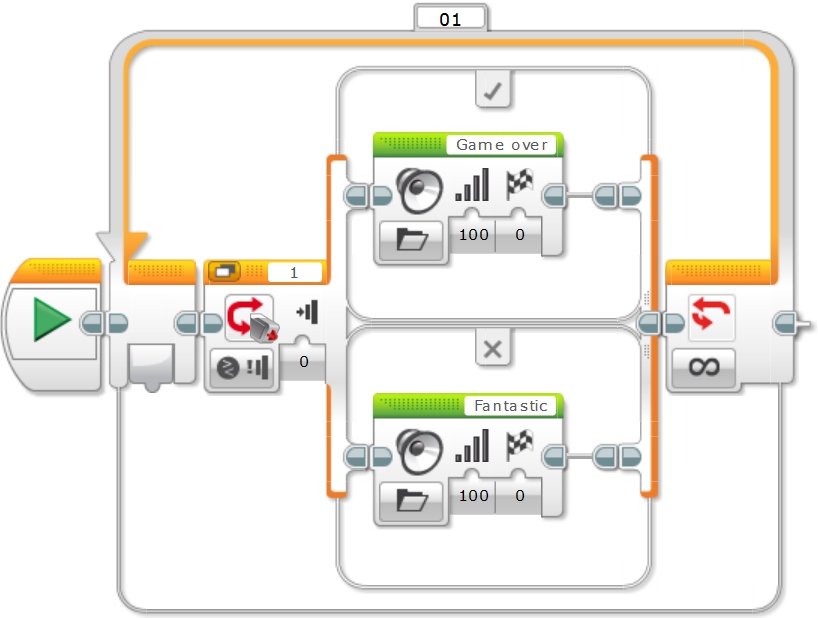
With the touch sensor not pressed, all three programs will play “Game over” continuously. If the button is held down, all three programs will play “Fantastic” continuously. It may appear that all three behaves identically, but they do not!
The third program uses “Measure” mode. If the button is quickly pressed and released during playback of “Game over”, it will not detect the button press and will continue playing “Game over”. This is expected, as the button wasn’t pressed at the point it is read. Since the button press occurs only during the playback, and the state is “Released” when the program loops back and checks the state, “Fantastic” does not get triggered.
The first two programs uses “Compare” and the behavior differs. When using “Compare”, there are three possible states for the touch sensor (0 – Released, 1 – Pressed, 2 – Bumped) and they are mutually exclusive. A sensor that was “Bumped” will be in state 2. If you check if it is “Released” (state 0), it will return False. As a result, if the button was pressed anytime between two reads, the program will play “Fantastic”.
In summary…
In Compare mode
- There are 3 possible states, Released, Pressed, or Bumped, and they are mutually exclusive
- A Bumped sensor will return False when checked against Released
In Measure mode
- There are only 2 possible states, Pressed or Not Pressed
- A Bumped sensor will return Not Pressed
This behavior differs from the official Lego help page, and may potentially be a bug in EV3-G software (tested with EV3-G 1.3.2 and firmware 1.09E). If you encounter a different behavior, let us know!
Color Sensors (Mutual Interference)
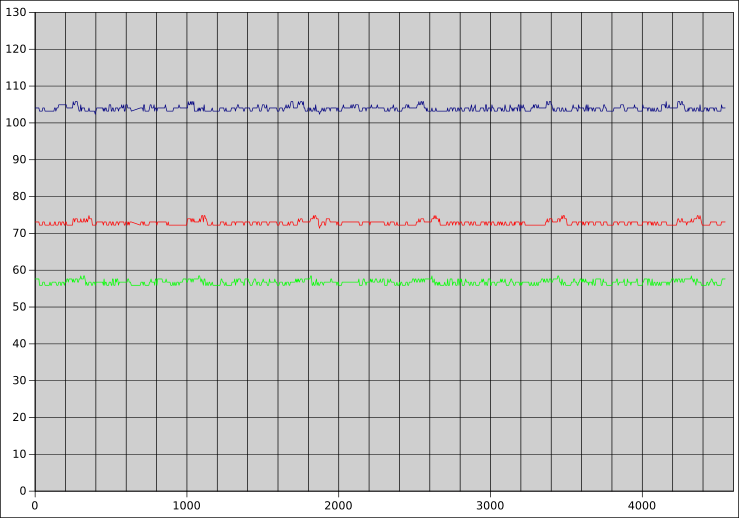
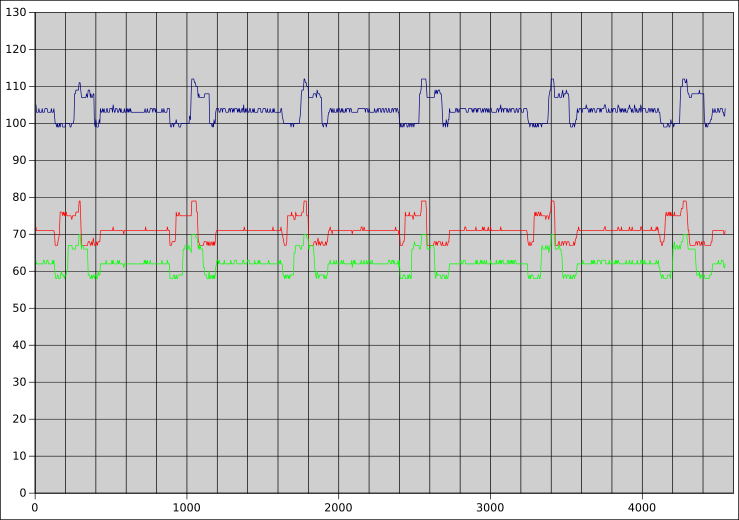
When using two sensors in close proximity (eg. for a two sensor line follower), they may interfere with each other. In the following charts, the two sensors are placed approximately 32mm from each other and 20mm from the ground. The red, green, and blue lines represents the raw reading for red, green, and blue respectively. You can see that there are frequent and significant errors on the second sensor, lasting around 300ms each time. On close observation, similar errors can be seen on the first sensor, but it is of a much lower magnitude.
Possible solutions includes:
- Position the sensors further apart or closer to the ground.
- Shield the sensors from each other.
- Try different sensors. Some seems to be more susceptible to interferences than others.
Color Sensors (Interference from room lighting)
The EV3 color sensors performs a calibration by first reading the light intensity with the LED off, before reading again with the LED on. This allows it to cancel the effect of the room lighting, making it fairly resistant to uneven or changing room lighting condition. However, it cannot handle lighting conditions that are changing very rapidly.
Dimmable LEDs usually achieve dimming by rapidly pulsing the LED on and off. These may occur too fast for our eyes to observe (…we simple see the lights getting dimmer), but the rapidly pulsing lights can introduce a lot of noise for the EV3 color sensors. If your room is equipped with such lights, be sure to either turn them fully on or off.
LED screens also pulses on and off, so if you’re holding a robot competition, keep the playing field well away from any large LED screens.
Color Sensors (LED Positions)
When in color or RGB mode, the EV3 color sensor will turn on all three of its LED (red, green, and blue). However, the three LEDs are slightly offset from each other, and this causes the output light to be offset as well. If you observe closely, you’ll see that the light near the center is approximately white, the light furtherest away from the mounting holes are blue, and the light closest to the mounting holes are green.
This causes the RGB readings to be skewed if the three LED lights are not fully on a single homogeneous color. To give an example, if the blue and red portion of the LED light are shining on a black line, while the green portion is on the white background, the RGB values will suggest that a green color is seen!
Unfortunately, we know of no easy ways to overcome this, but the problem can be minimized by ensuring that any transition between colors occurs in a left-right direction. This will ensure that the transiting color crosses all three LED at the same time.