IoTy
- Link to IoTy (Main) / Github version
- IoTy Documentations
- Google Cloud Vision Sample Code
- Micropython libraries (…look here if you need libraries for something that isn’t in IoTy)
- Request for mqtt account
- Online data sources (…for use with urequest)
- NUS Hack&Roll
Arduino
- Digital Input and Output (29 Jul)
- Analog Output (PWM) and Transistors (5 Aug)
- Analog Input and Serial (12 Aug)
- Hobby Servo
- Robotics Roadmap
- H-Bridge (11 Nov)
- Gyro, Construction, PID (18 Nov)
- Gyro Code (Basic)
- Gyro Code (Intermediate)
- Gyro Code (Complete)
Quadcopters
Recommended readings: “Make: Drones (Teach an Arduino to Fly), David McGriffy”. This book covers three quadcopters, and we’ll be using the second one (“The Visible Drone”, Chapter 6 to 13). As this is a very challenging build, we’ll be following closely to the book, but will have to make a few changes to accommodate differences in hardware.
Recommended Readings and Tutorials for Oct
Read up and try these tutorials; they’ll help you when you’re building your underwater robot. I’ll go over most of these when we resume club, but it’ll help for you to learn them first (…especially the programming practices, as I won’t have time to go through those in class).
Programming
C Programming: https://www.learn-c.org/
We didn’t dedicate any time purely for learning programming during class (…that would have taken up a few sessions on its own), so the coverage there is rather lacking. Try out the tutorials at the above site. You really only need the basics.
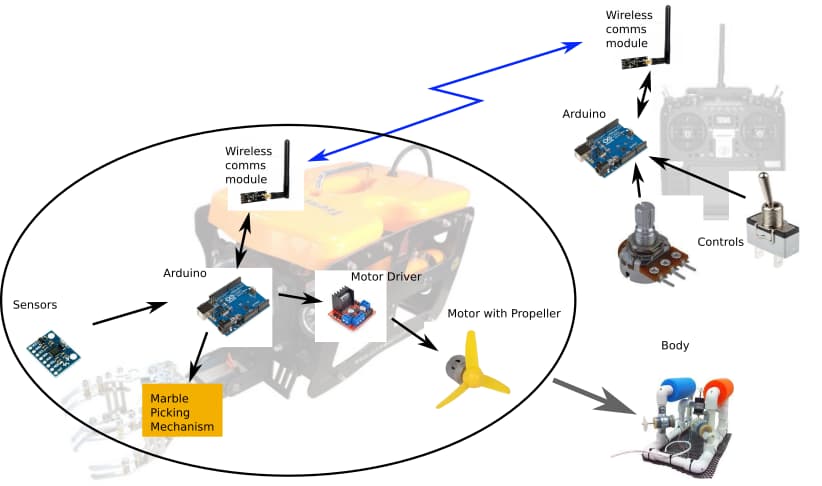
PID Controls
PID stands for “Proportional Integral Derivative” and is commonly used in engineering. We will likely required P and D for our underwater robot (I is good to have, but not necessary). To start, read this set of slides and try implementing a P only line following control for the robot in this simulator https://gears.aposteriori.com.sg (…use “Line Following Challenges” world). To test your understanding of P control, also try applying what you have learned to create a P only gyro follower in the simulator (…use “Gyro Challenges” world).
Motor Driver
Read up on H-Bridge, and understand why we need it. https://www.google.com/search?q=h+bridge We’ll be going through this in class as well.
Body
Read up on the popular Sea Perch design. WARNING: The Sea Perch is a LARGE and TETHERED underwater robot; not suitable for the SRG competition (…but it’s pretty decent for exploring the sea bed if you want to take it out to the sea). While you can’t copy the design for your own robot, you can learn from it.
Motor with Propellers
The Sea Perch provides one solution to running your motors underwater. Read up on some other methods https://www.google.com/search?q=run+motor+underwater. Find out how underwater pumps work https://www.google.com/search?q=cheap+underwater+pump
Sensors
I will recommend the use of a gyro and an atmospheric pressure sensor for your underwater robot. Read up on them: https://www.google.com/search?q=arduino+gyro and https://www.google.com/search?q=arduino+atmospheric+pressure Are there any other sensors that you’ll like to use? I will be going through this in class as well.
Wireless Comms Module
Unless you are choosing to build a fully autonomous robot, you’ll need to send commands from your controller to your robot. Read up on some of the ways to perform wireless communications on an Arduino https://www.google.com/search?q=arduino+wireless+communication I will go through at least two different options in class.
Marble Picking Mechanism
This one is on you. You’ll have to figure out a way to pick up the marbles yourself. You can pick it up with a claw, suction mechanism, or magic. It’s up to you. Think it through yourself.
Controls
For an underwater robot, there are at least 3 sets of controls (up-down, left-right, forward-back). Plan out how the interface for your controller should work.
Videos
From a quick search, I found these…
- https://www.youtube.com/watch?v=btCwvcL01K0
- https://www.youtube.com/watch?v=3X_eykCSLgw
- https://www.youtube.com/watch?v=-swDAm_m6jI
- https://www.youtube.com/watch?v=4IXmHL4xLiY
You can probably find more. Watch them to have an idea of what to expect. Do note that…
- All the robots works in pretty much the same way. I’ll be very ashamed of myself if I build a robot that works the same way as everyone else’s. Let’s do better.
- All of the teams are using an off-the-shelf RC remote control. I’m guessing the robot also consists of an off-the-shelf RC receiver module. We will NOT be using either of these. We’ll build our own.
- The robots all appear to be 100% manually controlled, and the competition basically boils down to who’s a better UAV driver. Let’s not compete on those terms. From the video, see if you can figure out why it is hard to control the robot and figure out a way to improve it through design or automation.